AB-3 Developer Guide
Acknowledgements
- Address Book 3: HRMate is built on top of AB3
- JavaFX: The GUI framework used in HRMate
- Jackson: JSON parsing library used to read and write HRMate's JSON data files
- MarkBind: Used to generate HRMate's project site
Setting up, getting started
Refer to the guide Setting up and getting started.
Design
Architecture
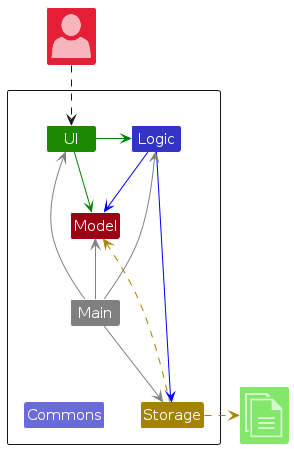
The Architecture Diagram given above explains the high-level design of the App.
Given below is a quick overview of main components and how they interact with each other.
Main components of the architecture
Main (consisting of classes Main and MainApp) is in charge of the app launch and shut down.
- At app launch, it initializes the other components in the correct sequence, and connects them up with each other.
- At shut down, it shuts down the other components and invokes cleanup methods where necessary.
The bulk of the app's work is done by the following four components:
UI: The UI of the App.Logic: The command executor.Model: Holds the data of the App in memory.Storage: Reads data from, and writes data to, the hard disk.
Commons represents a collection of classes used by multiple other components.
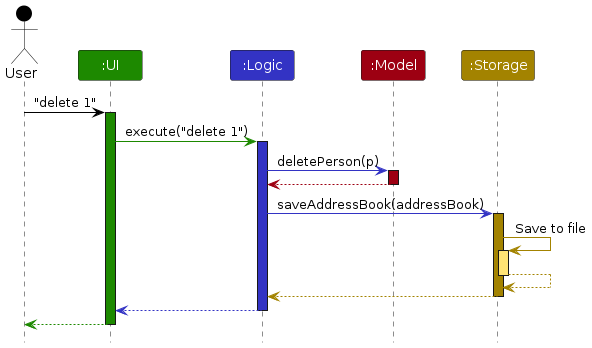
How the architecture components interact with each other
The Sequence Diagram below shows how the components interact with each other for the scenario where the user issues the command delete 1.
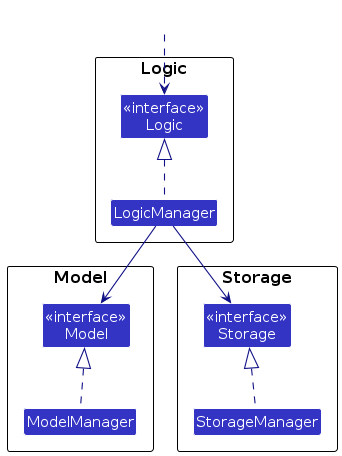
Each of the four main components (also shown in the diagram above),
- defines its API in an
interfacewith the same name as the Component. - implements its functionality using a concrete
{Component Name}Managerclass (which follows the corresponding APIinterfacementioned in the previous point).
For example, the Logic component defines its API in the Logic.java interface and implements its functionality using the LogicManager.java class which follows the Logic interface. Other components interact with a given component through its interface rather than the concrete class (reason: to prevent outside component's being coupled to the implementation of a component), as illustrated in the (partial) class diagram below.
The sections below give more details of each component.
UI component
The API of this component is specified in Ui.java
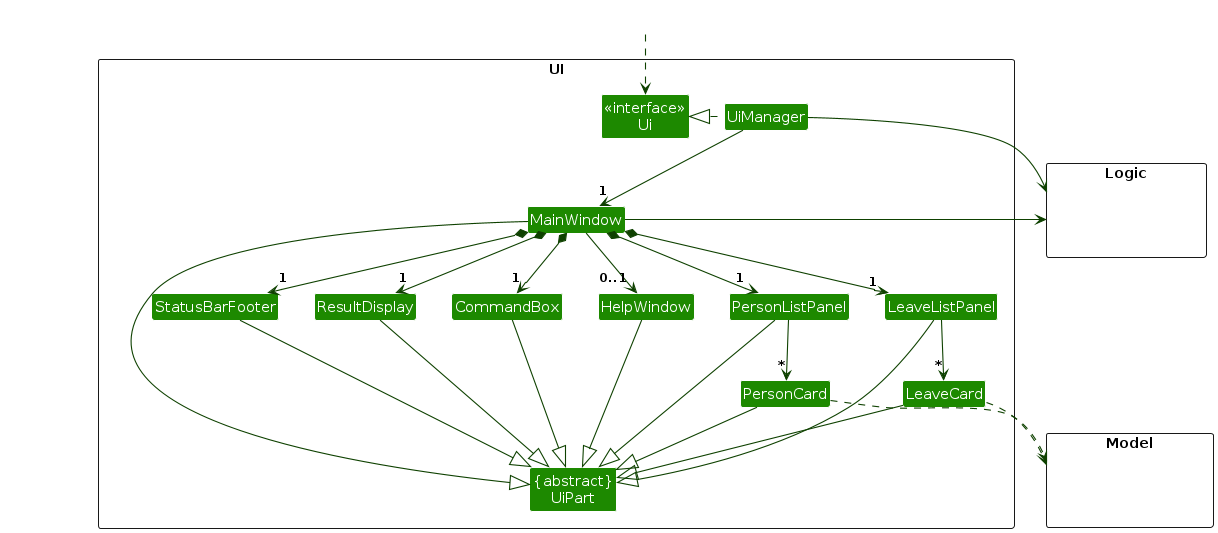
The UI consists of a MainWindow that is made up of parts e.g.CommandBox, ResultDisplay, PersonListPanel, LeaveListPanel, StatusBarFooter etc. All these, including the MainWindow, inherit from the abstract UiPart class which captures the commonalities between classes that represent parts of the visible GUI.
The UI component uses the JavaFx UI framework. The layout of these UI parts are defined in matching .fxml files that are in the src/main/resources/view folder. For example, the layout of the MainWindow is specified in MainWindow.fxml
The UI component,
- executes user commands using the
Logiccomponent. - listens for changes to
Modeldata so that the UI can be updated with the modified data. - keeps a reference to the
Logiccomponent, because theUIrelies on theLogicto execute commands. - depends on some classes in the
Modelcomponent, as it displaysPersonandLeaveobjects residing in theModel.
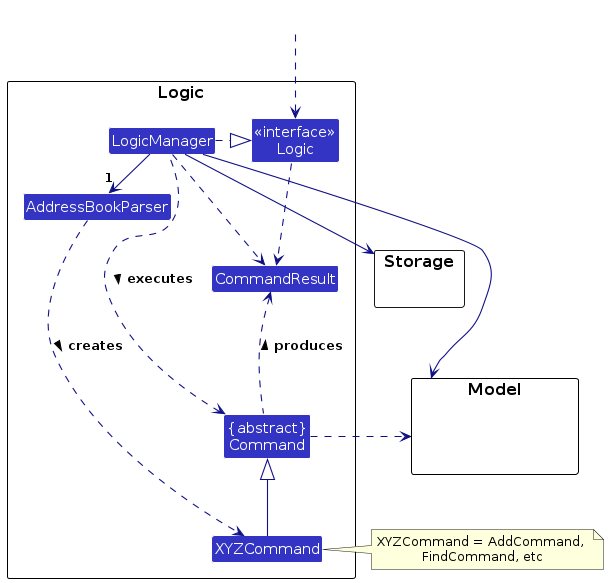
Logic component
API : Logic.java
Here's a (partial) class diagram of the Logic component:
The sequence diagram below illustrates the interactions within the Logic component, taking execute("delete 1") API call as an example.
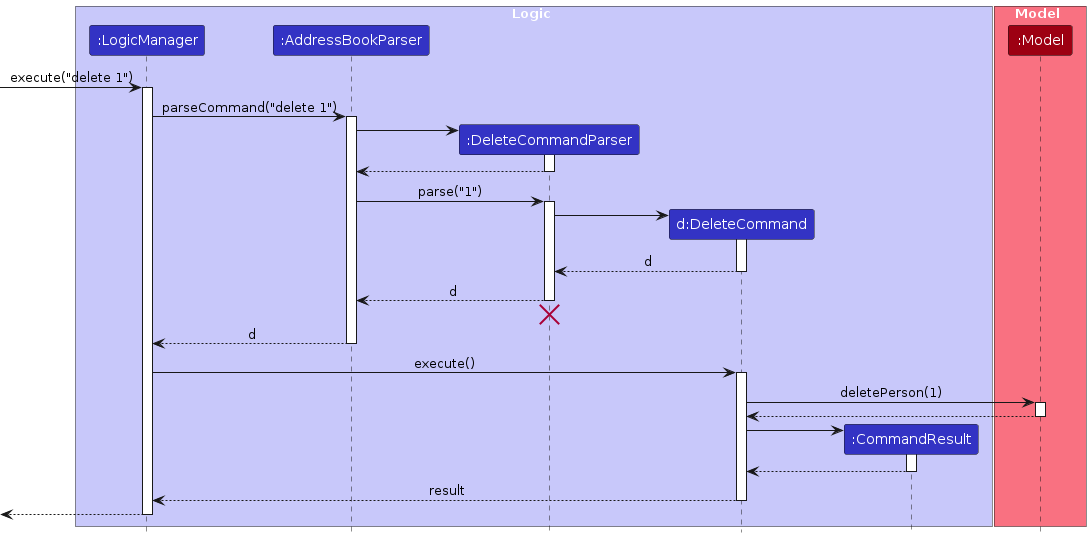
Note: The lifeline for DeleteCommandParser should end at the destroy marker (X) but due to a limitation of PlantUML, the lifeline reaches the end of diagram.
How the Logic component works:
- When
Logicis called upon to execute a command, it is passed to anAddressBookParserobject which in turn creates a parser that matches the command (e.g.,DeleteCommandParser) and uses it to parse the command. - This results in a
Commandobject (more precisely, an object of one of its subclasses e.g.,DeleteCommand) which is executed by theLogicManager. - The command can communicate with the
Modelwhen it is executed (e.g. to delete a person). - The result of the command execution is encapsulated as a
CommandResultobject which is returned back fromLogic.
Here are the other classes in Logic (omitted from the class diagram above) that are used for parsing a user command:
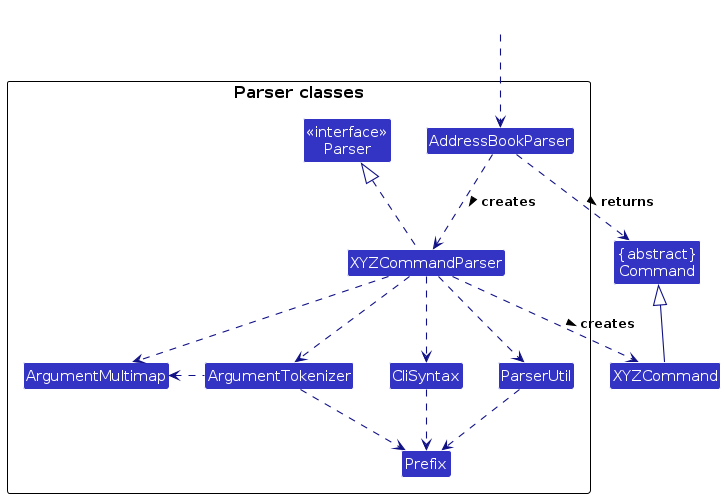
How the parsing works:
- When called upon to parse a user command, the
AddressBookParserclass creates anXYZCommandParser(XYZis a placeholder for the specific command name e.g.,AddCommandParser) which uses the other classes shown above to parse the user command and create aXYZCommandobject (e.g.,AddCommand) which theAddressBookParserreturns back as aCommandobject. - All
XYZCommandParserclasses (e.g.,AddCommandParser,DeleteCommandParser, ...) inherit from theParserinterface so that they can be treated similarly where possible e.g, during testing.
Model component
API : Model.java
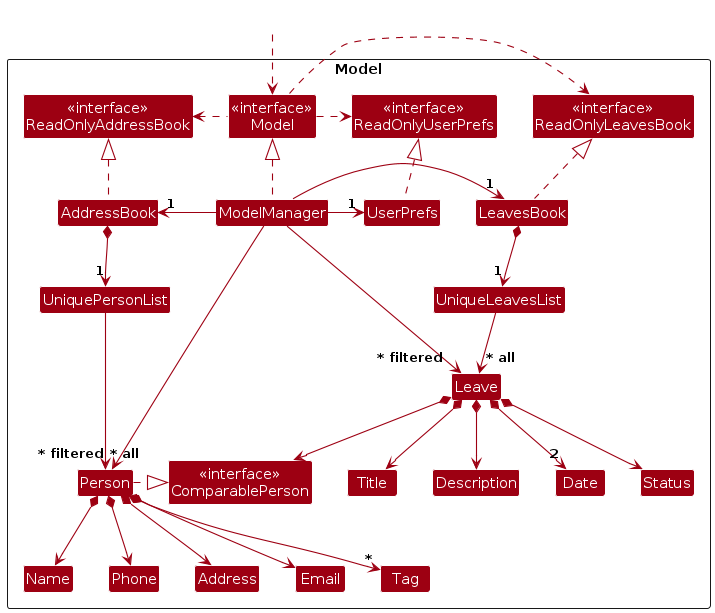
The Model component,
- stores the address book data i.e., all
Personobjects (which are contained in aUniquePersonListobject). - stores the leaves book data as well i.e., all
Leavesobjects (which are contained in aUniqueLeavesListobject). - stores the currently 'selected'
Personobjects (e.g., results offind) as a separate filtered list which is exposed to outsiders as an unmodifiableObservableList<Person>that can be 'observed' e.g. the UI can be bound to this list so that the UI automatically updates when the data in the list changes. - stores the currently 'selected'
Leaveobjects (e.g. results offind-leave) as a separate filtered list which is exposed to outsiders as an unmodifiableObservableList<Leave>that can be 'observed' e.g. the UI can be bound to this list so that the UI automatically updates when the data in the list changes. - stores a
UserPrefobject that represents the user’s preferences. This is exposed to the outside as aReadOnlyUserPrefobjects. - does not depend on any of the other three components (as the
Modelrepresents data entities of the domain, they should make sense on their own without depending on other components)
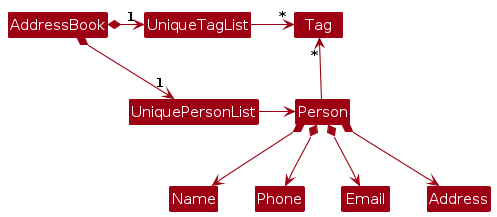
Note: An alternative (arguably, a more OOP) model is given below. It has a Tag list in the AddressBook, which Person references. This allows AddressBook to only require one Tag object per unique tag, instead of each Person needing their own Tag objects.
Storage component
API : Storage.java

The Storage component,
- can save the address book data, leaves book data and user preference data in either JSON or CSV format, and read them back into corresponding objects.
- inherits from both
AddressBookStorage,LeavesBookStorageandUserPrefStorage, which means it can be treated as either one (if only the functionality of only one is needed). - depends on some classes in the
Modelcomponent (because theStoragecomponent's job is to save/retrieve objects that belong to theModel)
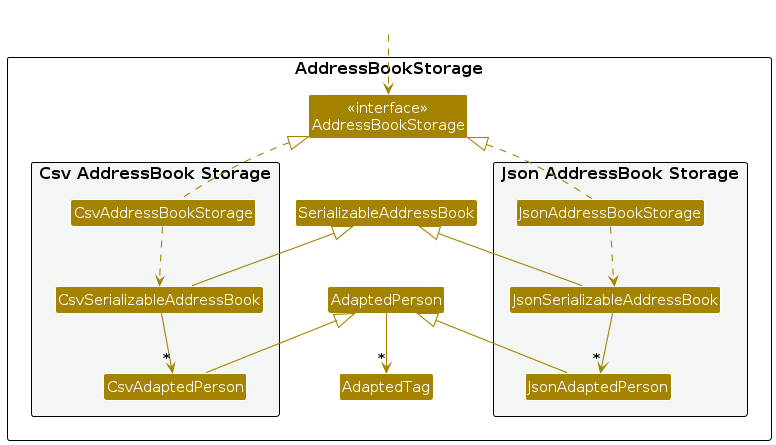
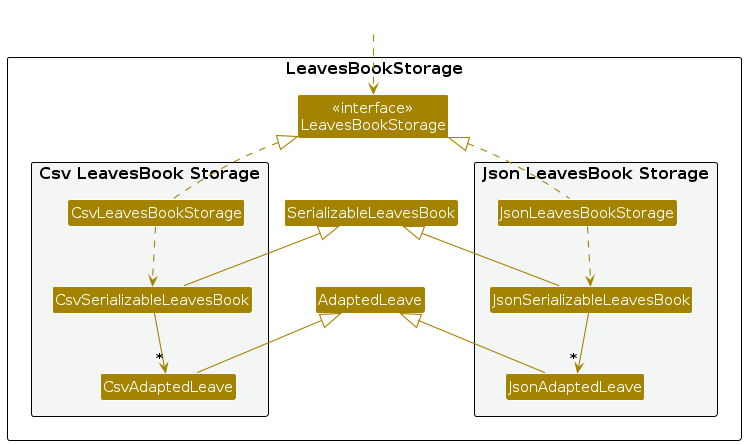
Both AddressBookStorage and LeavesBookStorage contain JSON and CSV implementations. These implementations exist separately
as their methods invoke methods from different Util files - the JSON implementation invokes JsonUtil methods, while the
CSV implementation invokes CsvUtil methods. SerializableAddressBook, SerializableLeavesBook, AdaptedPerson and
AdaptedLeave have been abstracted out to promote code reusability, with the use of generics where possible to enforce
type safety.
Common classes
Classes used by multiple components are in the seedu.addressbook.commons package.
Implementation
This section describes some noteworthy details on how certain features are implemented.
The Person class
ManageHR keeps track of employees within the company with the use of Person and UniquePersonList. The UniquePersonList serves as a container for the Person objects,
while enforcing the constraints that no 2 employees have the same name.
The Person class contains the following attributes.
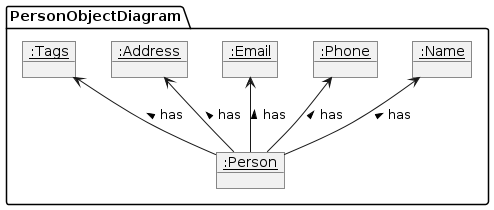
Name: The name of the employee.Phone: The phone number of the employee.Email: The email address of the employee.Address: The address of the employee.Tags: The customised tag added by the user.
The Leave class
ManageHR keeps track of the leaves of employees within the company with the use of Leave and UniqueLeaveList. The UniqueLeaveList serves as a container for the Leave objects,
while enforcing the constraints that no 2 leaves can have same start date and end date for the same employee.
The Leave class contains the following attributes.
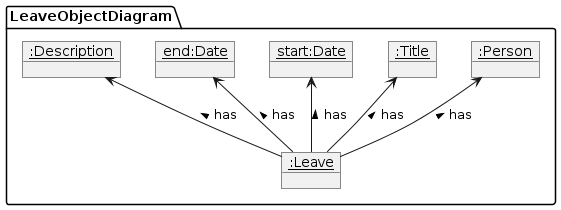
ComparablePerson: The employee.Title: The title of the leave.Description: The description of the leave.Date start: The start date of the leave.Date end: The end date of the leave.Status: The status of the leave.
Date start must be earlier than or the same as the Date end.
All the attributes except Description and Status are compulsory fields for adding a leave.
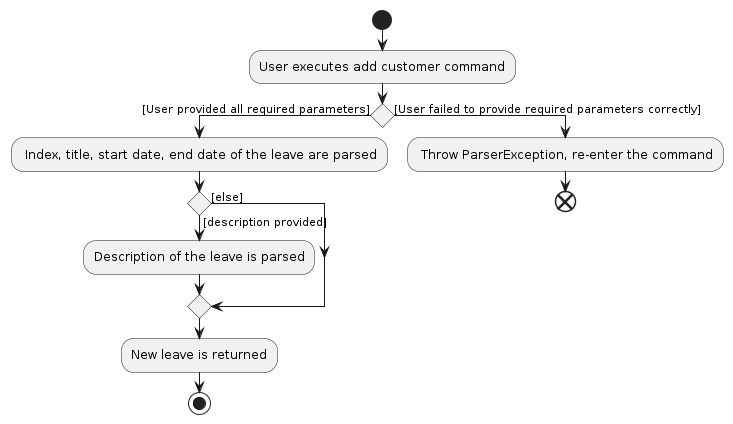
Add A Leave application feature
The add-leave command allows the HR manager to add a leave record for a specific employee. This feature enhances the HRMate system by providing a way to manage and track employee leaves efficiently.
Fields compulsory to enter for add-leave as String type include:
index: The index of the person for the leave application. It will be parsed asIndextype toAddLeaveCommandobject and converted toPersontype based on the displayed list when a newLeaveobject created.title: The title of the leave, it will be parsed asTitletype toAddLeaveCommandobject and to the newly createdLeaveobject.date start: The start date of the leave in "yyyy-MM-dd" format. It will be parsed together withdate endasRangetype toAddLeaveCommandobject and to the newly createdLeaveobject.date end: The end date of the leave in "yyyy-MM-dd" format. It will be parsed together withdate startasRangetype toAddLeaveCommandobject and to the newly createdLeaveobject.description: The description of the leave. It is optional and will be parsed asNONEif no description field exists. Otherwise it will be parsed asDescriptiontype toAddLeaveCommandobject and to the newly createdLeaveobject.
- CommandException due to unfounded index in the list will be thrown and handled in
AddLeaveCommand. - InvalidValueExceptions thrown due to illegal arguments, and EndBeforeStartExceptions thrown due to the end date occurring before the start date, will be handled by ParserException in
AddLeaveCommandParser. - CommandException due to duplicated leaves that have exact start and end dates will be thrown and handled at the line
model.addLeave(toAdd)inAddLeaveCommand#execute.
The activity diagram for adding a leave is as followed:
Here is an example usage of the add-leave feature:
- The user uses the
findcommand to filter for employees named Martin. - The user enters the command
add-leave 1 title/Sample Leave 1 start/2023-11-01 end/2023-11-01with Martin being index 1. - A record of leave with specified title and dates for Martin is created.
Design considerations
The command follows a structured format to ensure ease of use and to minimize errors. The use of an index ensures that the leave is associated with a specific employee. The format of the command is designed to be clear and straightforward.
Find an Employee by tags
FindAllTagCommand and FindSomeTagCommand are implemented similar to FindCommand.
They use TagsContainAllTagsPredicate and TagsContainAllTagsPredicate respectively as predicate to filter the employee list. And then update the displayed employee list of the model
The following sequence diagram shows how FindAllTagCommand executes.
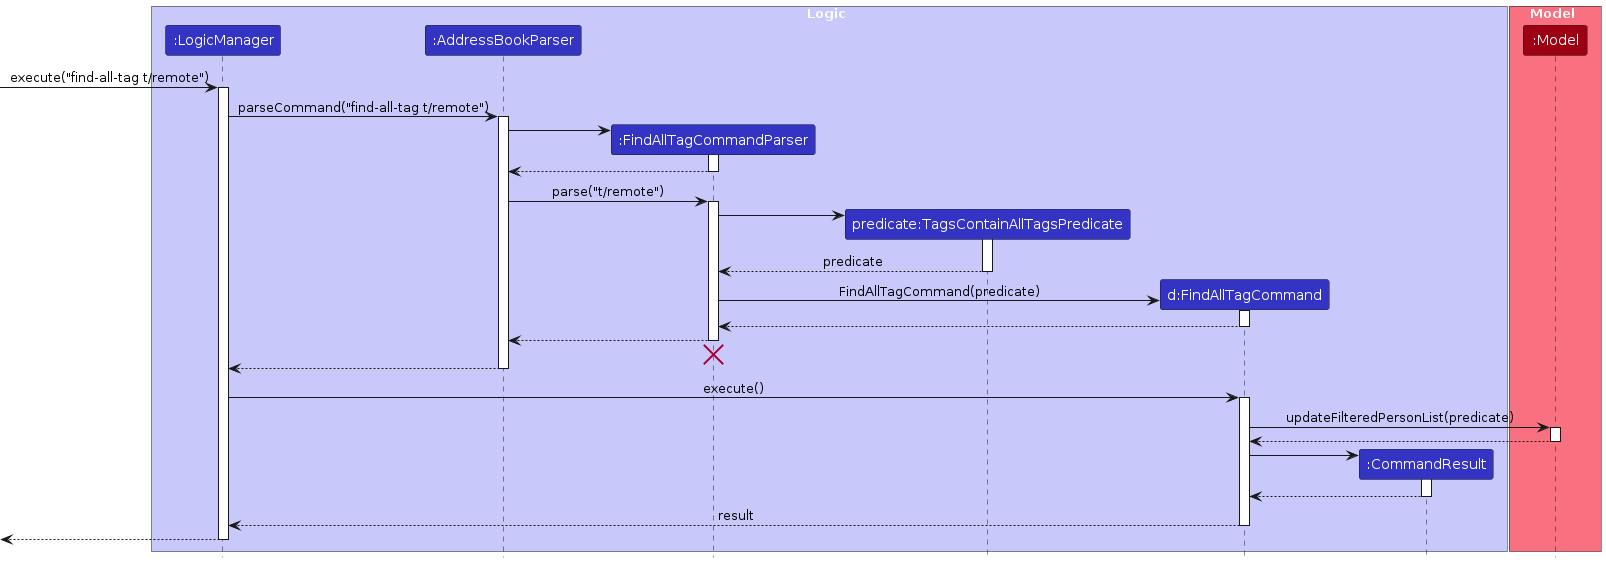
Design considerations:
FindAllTagCommand matches employees with all specified tags while FindSomeTagCommand matches employees with any of the specified tags.
The nuance difference is made to cater to users' needs for efficient searching.
Adding tag feature
Implementation
AddTagCommand is implemented similar to EditCommand.
A new Person is created with the information from the old Person.
The tags are then added before replacing the old Person with the new Person.
The following activity diagram summarizes what happens when a user executes a new command:
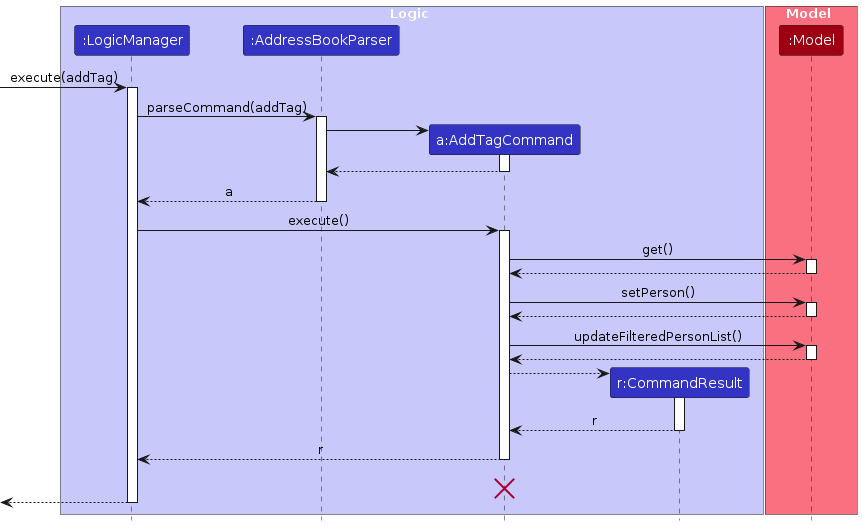
Design considerations:
Aspect: How AddTagCommand executes:
- Alternative 1 (current choice): Builts a new Person.
- Pros: Easy to implement (using
EditCommandas reference), immutability allows for potential redo and undo commands. - Cons: Memory intensive, costly in terms of time.
- Pros: Easy to implement (using
- Alternative 2: Add tags to
Person.- Pros: Memory efficient
- Cons: Mutable
Personcan affect implementation of potential redo and undo commands.
Find leave by period feature
Implementation
FindLeaveByPeriodCommand is implemented similar to FindCommand. It uses a LeaveInPeriodPredicate as the predicate to filter
the leaves list.
The predicate can be in 1 of 4 possible states
- Return true for all leaves - no start and end date is supplied for the query
- Return true for all leaves with at least one day in the period [start, end] inclusive - both start and end dates are supplied for the query
- Return true for all leaves with at least one day occurring on or after the query start date - only the start date is supplied for the query
- Return true for all leaves with at least one day occurring on or before the query end date - only the end date is supplied for the query
The following sequence diagram shows how FindLeaveByPeriodCommand executes.
A LeaveInPeriodPredicate is constructed from the query supplied by the user, defining both a start (if provided) and end (if provided). When the command is executed, the model's FilteredLeaveList is updated to only returns leaves that satisfy the predicate.
Import file
The import feature allows users to import employee records and leave applications in CSV format, increasing portability of
the user's data. The import feature can provide a means of mass adding employee records and leave applications, without having to use
the add command repeatedly. Since both importing employee records and leave applications involve similar sequences,
the following will describe the sequence for importing employee records.
Here is an example usage of the import feature:
- User executes the
importcommand. - User navigates to the file to import using the file dialog that opens.
- User selects the file and clicks on the Open button of the file dialog.
- All contacts in the address book will be overwritten by the contents of the imported file
The following activity diagram shows the steps involved in the Import command:
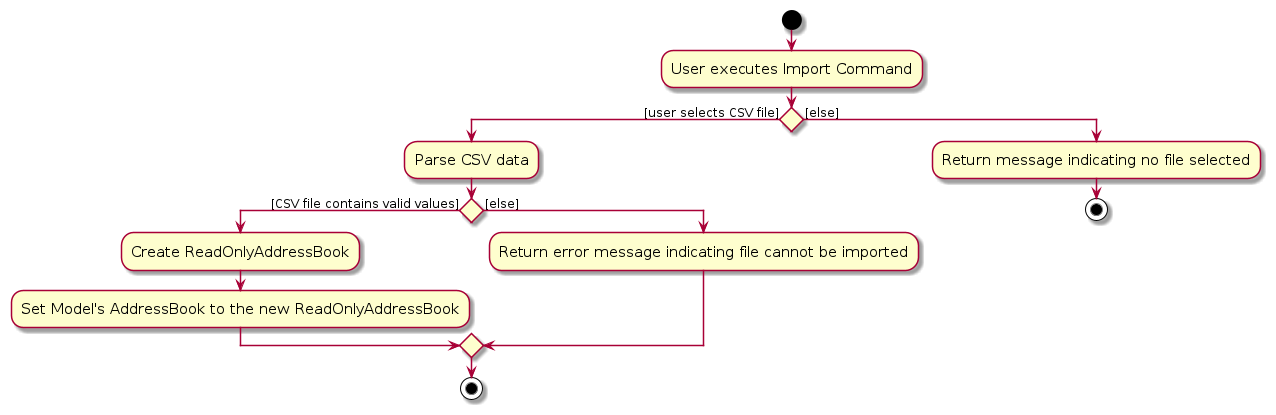
The CSV file is read into a CsvFile object, which is then converted into a CsvSerializableAddressBook object by reading each row and the corresponding values for each column. The CsvSerializableAddressBook is then converted into an AddressBook instance, which replaces the current AddressBook instance in the app.
Design considerations
Aspect: How the user selects files
- Alternative 1 (current choice): Select from graphical file dialog
- Pros: More intuitive for the user to navigate and locate the file
- Cons: File dialog is harder to navigate with just the keyboard
- Alternative 2: User types in file path in the command
- Pros: The user can perform the operation entirely by keyboard
- Cons: Users are more likely to type in the wrong file name, and selecting a file in a different folder would require typing out the entire relative file path
Export feature
The export feature enables users to export employee records and leave applications into CSV format, which can then be opened in other spreadsheet applications. It allows users to select filtered data to export, providing greater granularity in control over file content. Since both exporting employee records and leave applications involve similar sequences, the following will describe the sequence for exporting employee records.
Here is an example usage of the export feature:
- The user uses the
find-some-tagcommand to filter for employees with thefull timetag - The user enters the command
export fulltimers - A file will be created in
{home folder of HRMate}/exports, with the namefulltimers.csv. This file contains employees with thefull timetag.
The following sequence diagram shows the steps involved in the Export command:
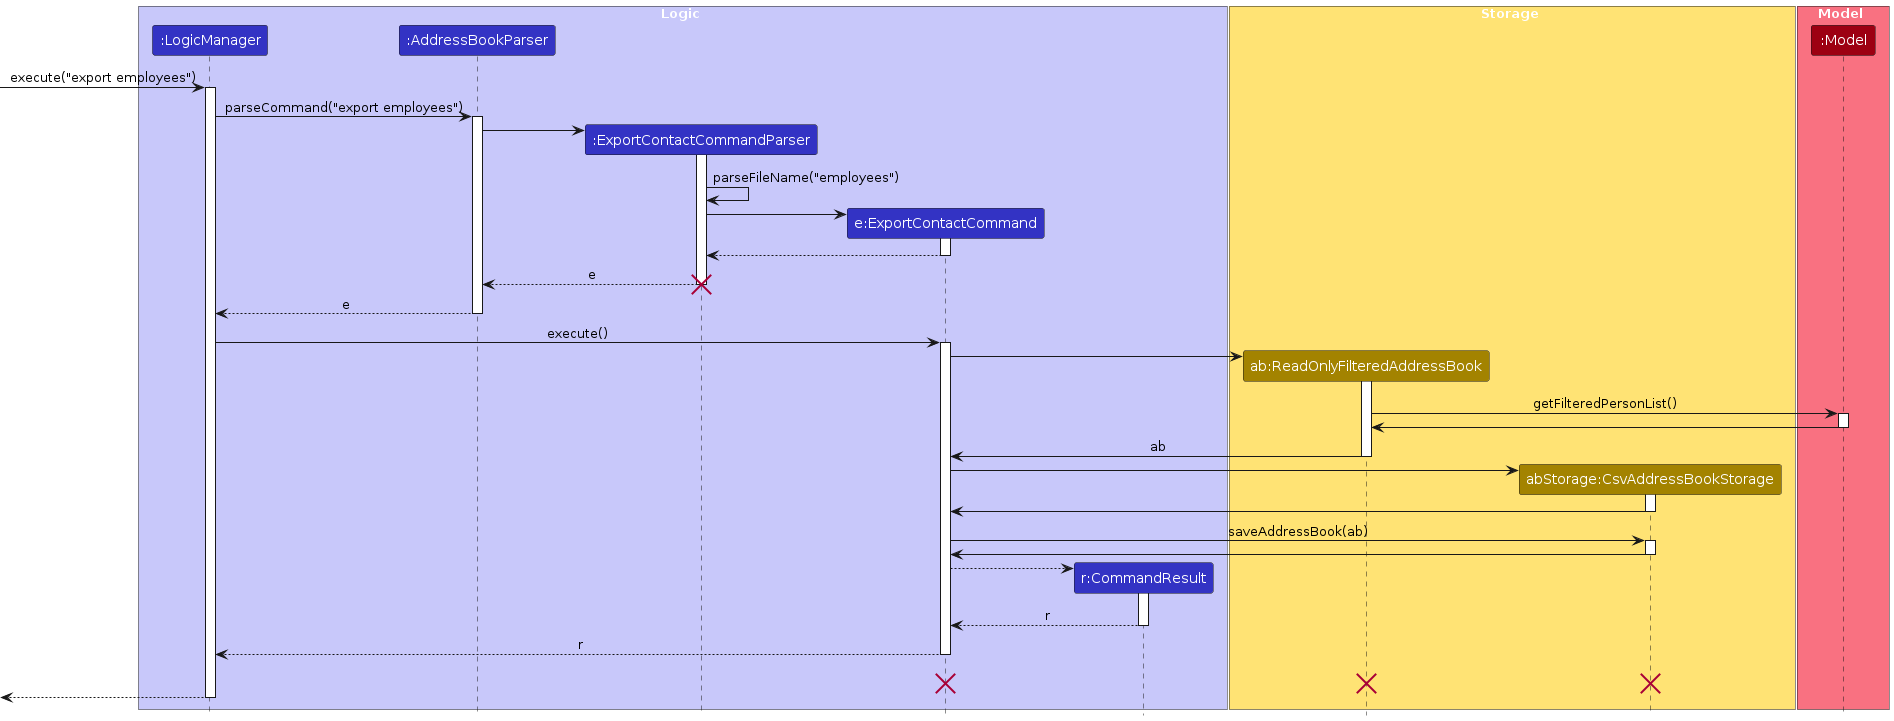
ExportContactCommandParser::parseFileName() checks if the file name provided is a valid file name. If the user provided a path, it strips the path to retain only the file name. Next, it appends a ".csv" extension to the end of the file name if the user did not supply the extension.
The export command works by retrieving the filtered employee list in the address book, which contains a list of employee records that are currently visible in the address book panel. A CsvSerializableAddressBook is constructed from this filtered person list, which is then serialized into a CsvFile object. CsvUtil then writes the CsvFile instance into a CSV file. This file is saved in the "export" folder that is created in the same location as the HRMate application file.
Design considerations
Aspect: Whether to allow the user to select the location to save the file to
- Alternative 1 (current choice): Disallow selecting the save location
- Pros: File dialog is not required as all files will be saved in the same place, allowing the entire operation to be performed using the keyboard
- Cons: Loss of flexibility in choosing the save location, especially if the user wants to save multiple copies with the same file name in different locations
- Alternative 2: Allow selecting the save location
- Pros: Provides flexibility for the user to choose a preferred save location
- Cons: File dialogs would require the use of a mouse
[Proposed] Undo/redo feature
Proposed Implementation
The proposed undo/redo mechanism is facilitated by VersionedAddressBook. It extends AddressBook with an undo/redo history, stored internally as an addressBookStateList and currentStatePointer. Additionally, it implements the following operations:
VersionedAddressBook#commit()— Saves the current address book state in its history.VersionedAddressBook#undo()— Restores the previous address book state from its history.VersionedAddressBook#redo()— Restores a previously undone address book state from its history.
These operations are exposed in the Model interface as Model#commitAddressBook(), Model#undoAddressBook() and Model#redoAddressBook() respectively.
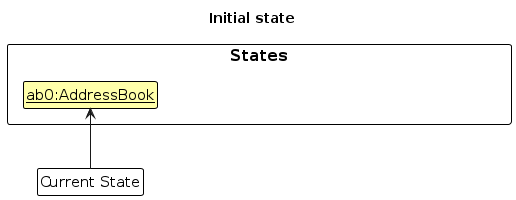
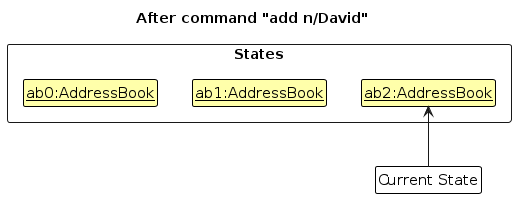
Given below is an example usage scenario and how the undo/redo mechanism behaves at each step.
Step 1. The user launches the application for the first time. The VersionedAddressBook will be initialized with the initial address book state, and the currentStatePointer pointing to that single address book state.
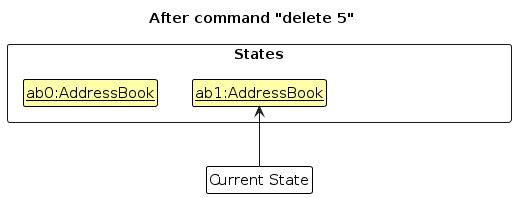
Step 2. The user executes delete 5 command to delete the 5th person in the address book. The delete command calls Model#commitAddressBook(), causing the modified state of the address book after the delete 5 command executes to be saved in the addressBookStateList, and the currentStatePointer is shifted to the newly inserted address book state.
Step 3. The user executes add n/David … to add a new person. The add command also calls Model#commitAddressBook(), causing another modified address book state to be saved into the addressBookStateList.
Note: If a command fails its execution, it will not call Model#commitAddressBook(), so the address book state will not be saved into the addressBookStateList.
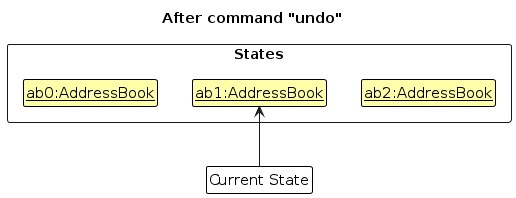
Step 4. The user now decides that adding the person was a mistake, and decides to undo that action by executing the undo command. The undo command will call Model#undoAddressBook(), which will shift the currentStatePointer once to the left, pointing it to the previous address book state, and restores the address book to that state.
Note: If the currentStatePointer is at index 0, pointing to the initial AddressBook state, then there are no previous AddressBook states to restore. The undo command uses Model#canUndoAddressBook() to check if this is the case. If so, it will return an error to the user rather
than attempting to perform the undo.
The following sequence diagram shows how the undo operation works:
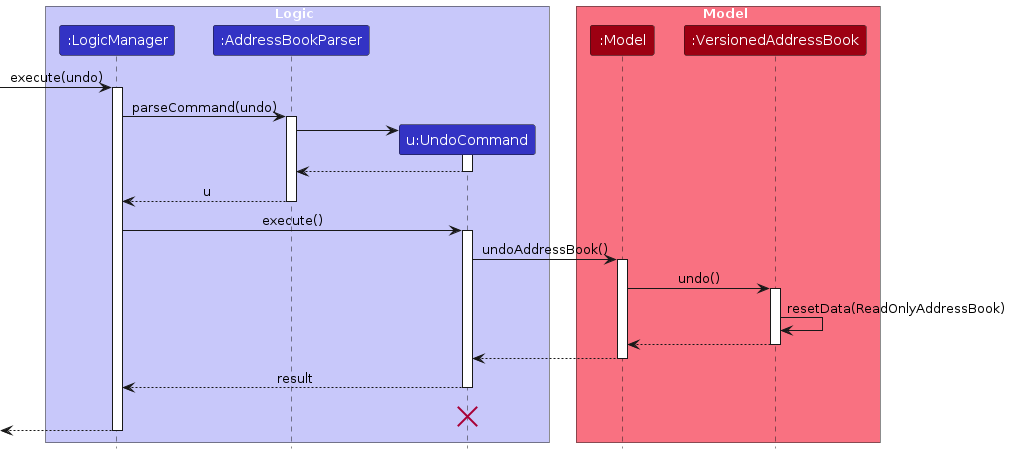
Note: The lifeline for UndoCommand should end at the destroy marker (X) but due to a limitation of PlantUML, the lifeline reaches the end of diagram.
The redo command does the opposite — it calls Model#redoAddressBook(), which shifts the currentStatePointer once to the right, pointing to the previously undone state, and restores the address book to that state.
Note: If the currentStatePointer is at index addressBookStateList.size() - 1, pointing to the latest address book state, then there are no undone AddressBook states to restore. The redo command uses Model#canRedoAddressBook() to check if this is the case. If so, it will return an error to the user rather than attempting to perform the redo.
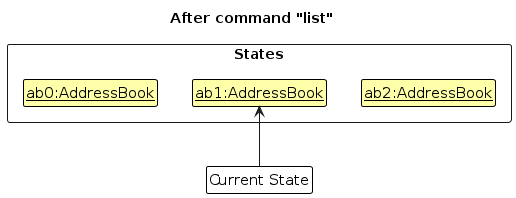
Step 5. The user then decides to execute the command list. Commands that do not modify the address book, such as list, will usually not call Model#commitAddressBook(), Model#undoAddressBook() or Model#redoAddressBook(). Thus, the addressBookStateList remains unchanged.
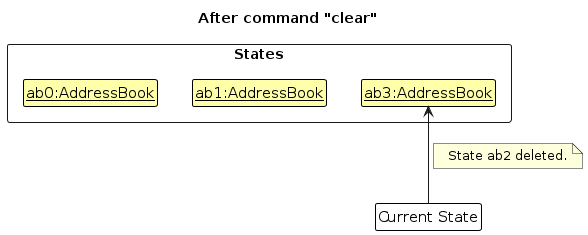
Step 6. The user executes clear, which calls Model#commitAddressBook(). Since the currentStatePointer is not pointing at the end of the addressBookStateList, all address book states after the currentStatePointer will be purged. Reason: It no longer makes sense to redo the add n/David … command. This is the behavior that most modern desktop applications follow.
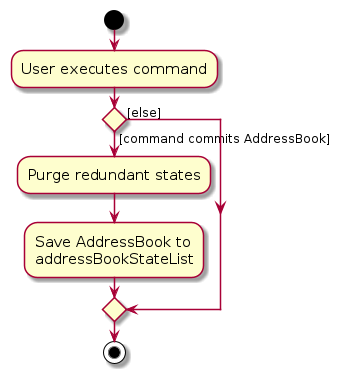
The following activity diagram summarizes what happens when a user executes a new command:
Design considerations:
Aspect: How undo & redo executes:
Alternative 1 (current choice): Saves the entire address book.
- Pros: Easy to implement.
- Cons: May have performance issues in terms of memory usage.
Alternative 2: Individual command knows how to undo/redo by itself.
- Pros: Will use less memory (e.g. for
delete, just save the person being deleted). - Cons: We must ensure that the implementation of each individual command are correct.
- Pros: Will use less memory (e.g. for
Documentation, logging, testing, configuration, dev-ops
Appendix: Requirements
Product scope
Target user profile:
- has a need to manage a sizeable number of employees' information
- prefer desktop apps over other types
- can type fast
- prefers typing to mouse interactions
- is reasonably comfortable using CLI apps
Value proposition: manage HR information faster than a typical mouse/GUI driven app
User stories
Priorities: High (must have) - * * *, Medium (nice to have) - * *, Low (unlikely to have) - *
| Priority | As a … | I want to … | So that I can … |
|---|---|---|---|
* * * | new user | see usage instructions | refer to instructions when I forget how to use the App |
* * * | HR manager | add a new employee | |
* * * | HR manager | delete an employee | remove employees who no longer work here |
* * * | HR manager | find an employee by name | locate details of employees without having to go through the entire list |
* * * | organised HR manager | add/delete a tag to an employee | change the label of an employee |
* * * | organised HR manager | view all my tags | filter by them |
* * * | organised HR manager | find employees by tags | find specific category of employees for higher level workflows |
* * * | HR manager | add a new leave application of an employee | keep track of the leaves applications |
* * * | HR manager | delete employees' leave applications | remove leave applications that have been cancelled by employees |
* * * | HR manager of a large organisation | find all leave applications of an employee | track the amount of leaves taken by an employee |
* * * | HR manager | approve/reject leave applications | update employees on their leave application status |
* * | HR manager | hide private contact details | minimize chance of someone else seeing them by accident |
* * | HR manager | import/export records in CSV format | open the records in other apps |
* * | HR manager of a large organisation | find all leave applications in a given period | forecast available manpower to avoid manpower shortages |
* * | HR manager of a large organisation | find all leave applications with a given status | check which applications are still pending |
* | HR manager of a large organisation | sort employees by name | locate an employee easily |
Use cases
(For all use cases below, the System is the HRMate and the Actor is the HR Manager, unless specified otherwise)
Use case: Add/delete a tag from an employee
MSS
User requests to find employee by name
HRMate shows a list of employees with the same name
User requests to add/delete a tag from a specific employee in the list
HRMate adds/deletes tag from specified employee
Use case ends.
Extensions
2a. The list is empty.
Use case ends.
3a. The given tag is invalid. (already there for add, not there for delete)
3a1. HRMate shows an error message.
Use case resumes at step 2.
Use case: Delete an employee
MSS
User requests to list employees
HRMate shows a list of employees
User requests to delete a specific employee in the list
HRMate deletes the employee
Use case ends.
Extensions
2a. The list is empty.
Use case ends.
3a. The given index is invalid.
3a1. HRMate shows an error message.
Use case resumes at step 2.
Use case: Import employee records
MSS
User requests to import employee records
User selects CSV file from file dialog
HRMate adds records in CSV file inside its list of employee records
HRMate displays a message indicating successful importing of file
Use case ends.
Extensions
2a. User cancels the file selection operation.
2a1. HRMate closes the file selection window and aborts the operation.
Use case ends.
3a. File is not of CSV file type
3a1. HRMate displays an error message.
Use case ends.
3b. File is corrupted, unable to read employee records
3b1. HRMate discards all data read in.
3b2. HRMate displays an error message.
Use case ends.
Use case: Export employee records
MSS
User requests to export employee records.
User supplies a name and path to save the records.
HRMate creates the CSV file containing the employee records with the specified name at the specified location.
HRMate displays a message indicating the file has been created.
Use case ends.
Extensions
2a. User does not supply a name
2a1. HRMate displays an error message
Use case ends.
2b. User does not supply a path/supplies an invalid path
2b1. HRMate creates the CSV file containing the employee records with the specified name at the default location (same folder where the save files are located)
Use case resumes at step 3.
3a. HRMate is unable to create the file due to errors (e.g. permission errors)
3a1. HRMate aborts the file creation operation.
3a2. HRMate displays an error message.
Use case ends.
Use case: List all tags
MSS
User requests to view all tags
HRMate shows a list of all available tags
Use case ends.
Extensions
2a. There is no existing tag in the system.
2a1. HRMate notifies the user of no existing tag in the system.
Use case ends.
Use case: List employees with at least one specified tags
MSS
User requests to find employees who match at least one of the specified tags
HRMate shows a list of employees who match at least one of the specified tags
Use case ends.
Extensions
2a. The specified tags do not exist in the system.
2a1. HRMate notifies the user of invalid tags.
Use case resumes at step 1.
2b. User does not provide any tags.
2b1. HRMate notifies the user of missing parameters.
Use case resumes at step 1.
Use case: List employees with all specified tags
MSS
User requests to view all tags
HRMate shows a list of all available tags
Use case ends.
Extensions
2a. There is no existing tag in the system.
2a1. HRMate notifies the user of no existing tag in the system.
Use case resumes at step 1.
Use case: Add a leave application
MSS
The HR manager requests to find an employee by name.
HRMate shows a list of employees with the same name.
The HR manager requests to add a leave application for the selected employee
HRMate adds the leave application to the employee's record based on the provided information.
Use case ends.
Extensions:
2a. The list of employees with the provided name is empty.
2a1. HRMate informs the HR manager that no employees with the given name were found.
Use case ends.
3a. The provided employee index is invalid.
3a1. HRMate shows an error message indicating that the employee name is not valid.
Use case resumes at step 2.
4a. The provided leave application details are invalid.
4a1. HRMate shows an error message specifying the issue with the provided details (e.g., date format, missing fields).
Use case resumes at step 3.
Non-Functional Requirements
- Should work on any mainstream OS as long as it has Java
11or above installed. - A user with above average typing speed (60 or more words per minute) for regular English text (i.e. not code, not system admin commands) should be able to accomplish most of the tasks faster using commands than using the mouse.
- Should have an intuitive and user-friendly interface, ensuring that HR managers can easily navigate and use its features without extensive training.
- HRMate should be capable of handling a growing volume of employee records (up to 1000 persons) without a substantial decrease in performance. It should efficiently manage and store data as the number of employees and records increases over time.
- HRMate should complete operations involving a single records within 500ms, and operations involving listing, searching, and filtering within 2s.
Appendix: Effort
HRMate is built for extensibility. Not much effort is needed to implement new commands that are variations of existing features, but effort is needed to add new entities.
Challenges Faced
The first challenge given is understanding the code infrastructure. HRMate uses many design patterns like Facade pattern, Command pattern and MVC pattern. Without knowledge of these patterns, HRMate would seem complicated and difficult to understand.
Overall the understanding that the Model is a Facade for AddressBook and LeavesBook, input commands follow the Command pattern, and that AddressBook and LeavesBook are the models, JavaFX is used for the view and ModelManager functions as the controller greatly help in the understanding of HRMate's infrastructure.
Another significant challenge is the implementation of the leaves module. Given HRMate's immutable design philosophy, some design choices like replacing stale Leave with new instances of Leave with the updated Person are chosen. Care must be taken to update Leave everytime a Person is replaced like in the EditCommand, AddTagCommand and DeleteCommand. When adding a new potential module like Report, we anticipate that care must be taken when the associated Person or Leave is replaced.
Effort Required
To illustrate the difference in effort, the effort needed to create AddTagCommand and the Leave module will be compared.
Given that AddTagCommand is a specific case of EditCommand, much of the logic is similar to EditCommand. In this case, AddTagCommand copies a Person, adds the new Tag before calling Model#SetPerson.
Adding a new command is easy compared to the implementation of the Leave module. We took inspiration from the Person class and created wrapper classes for the fields like Title, Description and Date. One of the significant challenges were the added constraint of comparing two fields, start and end. This logic was not present in Person. For example Name validations do not concern Tag validations and vice versa. In Leave case, start affects the validations for end, as end must be on or after start. To resolve this, we created Leave's constructor to use Range, whose creation mandates start be on or before end. This ensures that the created Leave adheres to the constraint of start being before or on end. We anticipate that the creation of other entities like Report to require the creation of new wrapper classes, or even validation classes to enforce validations that span across multiple fields.
Efforts were also spent on ensuring data validity for Person and Leave when the associated object is modified. As mentioned above, one of the challenges faced was the immutable principle that AB3 used. When a Person is edited through EditCommand, AddTagCommand or DeleteTagCommand, the old Person is replaced by the newly created Person. This results in some Leave pointing to the stale Person. Thus, Model#SetPerson and Model#DeletePerson must be amended to edit LeavesBook as well to avoid any Leave pointing to any stale Person. We expect that such methods like Model#SetPerson, Model#DeletePerson, Model#SetLeave, Model#DeleteLeave must be amended when adding new modules if the new entities is reliant on information from pre-existing entities.
Achievements of HRMate
- Successfully implemented second entity,
LeavealongsidePersonwith information consistency even whenPersonis edited or deleted. - Created new way to import data using csv for both
LeaveandPerson, opening up changing in app data to users who might not understand json. - Added 19 more commands while increasing code coverage by 2%.
Glossary
- Mainstream OS: Windows, Linux, Unix, OS-X
- Private contact detail: A contact detail that is not meant to be shared with others
Appendix: Instructions for manual testing
Given below are instructions to test the app manually.
Launch and shutdown
Initial launch
Download the jar file and copy into an empty folder
Double-click the jar file Expected: Shows the GUI with a set of sample contacts. The window size may not be optimum.
Saving window preferences
Resize the window to an optimum size. Move the window to a different location. Close the window.
Re-launch the app by double-clicking the jar file.
Expected: The most recent window size and location is retained.
Adding an employee
Adding an employee while all employees are being shown
Test case:
add n/John Doe p/98765432 e/johnd@example.com a/John Street, block 123 #01-01
Expected: The employee is added to the list. Details of the added leave shown in the status message.Test case:
add n/John Two p/98765431 e/johnt@example.com a/John Street, block 122 #01-01 t/remote
Expected: The employee is added to the list. Error details shown in the status message. Status bar becomes red.Test case:
add n/John Two p/98765431 e/johnt@example.com
Expected: The employee is not added to the list. Details of the added leave shown in the status message.Other incorrect add commands to try:
add,addwith missing compulsory fields,addwith illegal arguments in fields
Expected: Similar to previous.
Deleting an employee
Deleting a person while all persons are being shown
Prerequisites: List all persons using the
listcommand. Multiple persons in the list.Test case:
delete 1
Expected: First contact is deleted from the list. Details of the deleted contact shown in the status message. Timestamp in the status bar is updated.Test case:
delete 0
Expected: No person is deleted. Error details shown in the status message. Status bar becomes red.Other incorrect delete commands to try:
delete,delete x,...(where x is larger than the list size)
Expected: Similar to previous.
Deleting a person after applying a filter
Prerequisites: Filter to the second person using
find PERSON_NAMEwherePERSON_NAMEis the name of the second person.Test case:
delete 1
Expected: First visible contact is delete from the list. Details of the deleted contact shown in the status message. Timestamp in the status bar is updated.Test case:
delete 2
Expected: No person is delete. Error details shown in the status message. Status bar becomes red.Follow up actions:
list
Expected: Only the previously deleted person is deleted.
Adding a tag
Adding a tag to an employee while all employee are being shown
Prerequisites: List all employee using the list command. Multiple employees in the list.
Test case:
add-tag 1 t/full time
Expected: The tagfull timeis added to employee indexed 1 shown in the employee list. Details of the edited employee shown in the status message.Test case:
add-tag 1
Expected: No tag is added. Error details shown in the status message. Status bar becomes red.Other incorrect add-tag commands to try:
add-tag,add-tagwith illegal arguments in fields,add-tag x(where x is larger than the list size)
Expected: Similar to previous.
Editing an employee
Editing an employee while all employee are being shown
Prerequisites: List all employee using the list command. Multiple employees in the list.
Test case:
edit 2 p/98765432 e/johndoe@example.com t/full-time t/remote
Expected: Thephone number, email address and tags of the employee indexed 2 are changed to 98765432, johndoe@example.com and full-time and remote. Details of the edited employee shown in the status message.Test case:
edit 1 a/John street, block 123 #01-01 t/
Expected: The home address of the employee indexed 1 is changed to John street, block 123 #01-01 and all tags removed from the employee shown in the employee list. Details of the edited employee shown in the status message.Test case:
edit 1 a/ t/
Expected: No tag is added. Error details shown in the status message. Status bar becomes red.Other incorrect edit commands to try:
edit,editwith illegal arguments in fields,edit x(where x is larger than the list size)
Expected: Similar to previous.
Viewing all tags existing
- Viewing all tags while there are exsiting tags
Prerequisites: There are tags attached to the employees.
Test case:
view-tag
Expected: Tags shown in the status message.
Finding all tags matched
- Finding Employees with All Tags in a Valid Scenario
- Prerequisites:
- Have a dataset with employees having different tags, specifically
remote,full time,part timeandon-site. - List all employees using the list command to identify available tags.
- Have a dataset with employees having different tags, specifically
- Test Case:
find-all-tag t/remote t/full timeExpected: GUI Changes: A dedicated interface section displays a list of employees with both tagsremoteandfull time. Status message indicates the number of matched employees. Verify that employees with additional tags are also displayed. - Test Case:
find-all-tagExpected: Error message indicates an invalid command format.Status bar becomes red. - Test Case:
find-all-tag t/Nonexistent tagExpected: GUI Changes: A dedicated interface section displays no employee. Status message indicates 0 matched employee. - Test Case:
find-all-tag t/REMOTEExpected: GUI Changes: A dedicated interface section displays no employee. Status message indicates 0 matched employee. - Test Case:
find-all-tag t/123!Expected: Error message indicates illegal tag names. Status bar becomes red. - Test Case:
find-all-tag t/reExpected:Employees with tag namedreare displayed. Verify that employees with additional tags are also displayed.
- Prerequisites:
Finding some tags matched
- Finding Employees with All Tags in a Valid Scenario
- Prerequisites:
- Have a dataset with employees having different tags, specifically
remote,full time,part timeandon-site. - List all employees using the list command to identify available tags.
- Have a dataset with employees having different tags, specifically
- Test Case:
find-some-tag t/remote t/full timeExpected: GUI Changes: A dedicated interface section displays a list of employees with either tagsremoteandfull time. Status message indicates the number of matched employees. Verify that employees with additional tags are also displayed. - Test Case:
find-some-tagExpected: Error message indicates an invalid command format.Status bar becomes red. - Test Case:
find-some-tag t/Nonexistent tagExpected: GUI Changes: A dedicated interface section displays no employee. Status message indicates 0 matched employee. - Test Case:
find-some-tag t/REMOTEExpected: GUI Changes: A dedicated interface section displays no employee. Status message indicates 0 matched employee. - Test Case:
find-some-tag t/123!Expected: Error message indicates illegal tag names. Status bar becomes red. - Test Case:
find-some-tag t/reExpected:Employees with tag namedreare displayed. Verify that employees with additional tags are also displayed.
- Prerequisites:
Adding a leave
Adding a leave while all leaves are being shown
Prerequisites: List all leaves using the list-leaves command. Multiple leaves in the list.
Test case:
add-leave 1 title/Vacation start/2023-11-15 end/2023-11-20
Expected: The leave is added to the list. Details of the added leave shown in the status message. Timestamp in the status bar is updated.Test case:
add-leave 0 title/Conference start/2023-12-01 end/2023-12-03 d/Attending conference
Expected: No leave is added. Error details shown in the status message. Status bar becomes red.Other incorrect add-leave commands to try:
add-leave,add-leave x,...(where x is larger than the list size)
Expected: Similar to previous.
Saving data
Dealing with missing/corrupted data files
Open
./data/addressbook.jsonand delete the first character{. Then open HRMate.
Expected: HRMate opens an empty address book.Add a person using
addand a leave usingadd-leave, thenexit. Open./data/leavesbook.jsonand edit the fullName of the name of the employee of a leave. Reopen HRMate.
Expected: HRMate restores all data except for the edited leave.
Data integrity between Person and Leave
Dealing with edits to
Person- Add a
Personusingaddand aLeaveusingadd-leave. Edit thePersonname usingedit.
Expected: The Employee under the createdLeaveis edited also.
- Add a
Dealing with deletes to
Person- Add a
Personusingaddand aLeaveusingadd-leave. Delete thePersonwithdelete.
Expected: The previously createdLeaveis deleted also.
- Add a
Appendix: Planned Enhancements
export-allwould export bothPersonandLeave. HR Managers usually wants to move bothPersonandLeaveto another application, so being able to export both in a single csv sheet would help them do so.find-all-tags and find-any-tags searches for tags case insensitive. Since tags are used for categorising, HR Managers might see no difference between Intern and intern. Hence allowing case insensitive search in find-all-tags and find-any-tags would help HR Managers find employees more easily.
Mergable
import. Sometimes, HR Managers want to move data from one app to HRMate without removing all current employees. Allow HRMate to merge a csv file, with an option to overwrite current data or overwrite csv data when a same employee is encountered, would help HR Managers achieve this.Filtered
clear. Allowing HR Managers to select a group of employees to delete would be good. For example, they could usefind-any-tags t/intern,clearto delete all interns. Subsequently,listwould show all non intern employees.